Dedi Go Blog

Dedicated for Computer & Techno
Will Be Come Belajar PHP itu mudah


MAC address (Media Access Control address) is a quasi-unique identifier consists of a six byte number that attached to most network adapter card or network interface card (NIC). As such, all network cards, whether it’s of Ethernet NIC, Gigabit Ethernet NIC or wireless 802.11a/b/g/n WiFi or HiperLAN adapter, should have different MAC addresses, which also known as Ethernet Hardware Address (EHA) or adapter address.
In operating system, MAC address is often represented in 12-digit hexadecimal number. For example, 1A-2B-3C-4D-5E-6F. In practical usage, layer 2 MAC address is converted from layer 3 protocol addresses such as Internet Protocol (IP address) by ARP (Address Resolution Protocol), which then allowed each host to be uniquely identified and frames to be marked for specific hosts on broadcast networks, such as Ethernet. After translated (or when a host on LAN sends its MAC address to another machine which does n ot configured not to accept unrequested ARP replies on the network for preemptive caching), MAC address is cached on source PC ARP table for later use. Content of ARP table on each computer can be viewed by typing arp -a in Windows or arp in Linux. MAC address thus forms the basis of most of the layer 2 networking upon which higher OSI Layer protocols are built to produce complex, functioning networks.
There are many reasons or possibilities that an user may want to change the MAC address or a network adapter, which also known as MAC spoofing. For example, to bypass the MAC address filtering on firewall or router. The trick can be used to get pass the network access restriction by emulating a new unrestricted MAC address, or to gain access connection by spoof an authorized MAC address after sniffing the legitimate MAC address out of the air in MAC filtering Wi-Fi network.Beside, hackers or enthusiasts also spoofing another host’s MAC address as their own in order to receive traffic packets not meant for them, although ARP poisoning technique is more commonly used. However, changing MAC address can still keep the real information from been detected and logged by various services such as IDS, firewall, DHCP server, wireless access points and etc, and is essential protect user’s privacy. MAC spoofing also potentially trigger a Denial of Service (DoS) attack by causing routing problem with duplicating MAC address exists in the network, especially those similar with gateway and AP router’s BSSID (Basic Service Set Identifier.)
Whatever the reason, it’s pretty easy to change the MAC address or perform MAC spoofing on most of today’s hardware, listed below. Actually, the original MAC address is burnt and imprinted to the network card, and cannot be changed. However, operating system can spoof as if there is different MAC address for the network interface card using tricks below.

Change the MAC address in WindowsGo to Start -> Control Panel. Double click on Network Connections (inside Network and Internet Connections category in Windows XP). The, right click on the active network connection with network adapter that you want to change the MAC address (normally Local Area Network or Wireless Network Connection) and click on Properties.Above steps work in Windows XP, Windows 2000 and Windows Server 2003. For Windows Vista, access to NIC’s properties is from Control Panel -> Network and Internet -> Network and Sharing Center -> Manage Network Connections.Alternatively, if you already know which network adapter that’s responsible for your network or Internet connection, go to Device Manager and open the properties dialog by double click on the NIC itself.
  1. In the General tab, click on the Configure button.
  2. Click on Advanced tab.
  3. In the Property section, select and highlight Network Address or Locally Administered Address.
  4. To the right, “Not Present” radio button is by default selected as value. Change the value by clicking on radio button for Value:, and then type in a new MAC address to assign to the NIC.
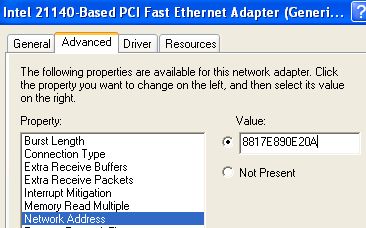

The MAC address consists of 6 pairs of numbers (0 – 9) and characters (A – F) combination. For example, 88-17-E8-90-E2-0A. When entering the new MAC value, omit the dash (-), for example 8817E890E20A.

Click OK when done.
To verify the change of MAC address, go to command prompt, then type in one of the following commands:ipconfig /allnet config rdr
Reboot the computer if successful to make the change effective.
Note: To restore or reset back to original default MAC address, simply set back the option to “Not Present”.
Change the MAC Address of NIC in Windows via Registry

  1. Open a command prompt.
  2. Type the following command and hit Enter : ipconfig /all
  3. Record down the Description and the Physical Address (is MAC address) of the active network connection (discard those with Media Disconnected state).
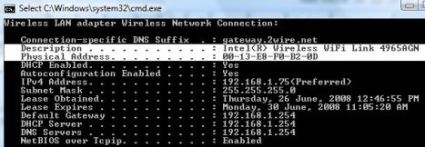
For example, in figure above, Description is Intel(R) Wireless WiFi Link 4965AGN and MAC address is in the format of 00-XX-XX-XX-XX-XX.
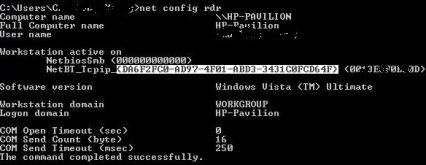
  4. In the command prompt also, type the following command and hit Enter :net config rdr
  5. Record down the GUID for the MAC address for the active connection’s NIC which MAC address to be changed. The GUID is contained within the { and } brackets right in front of the MAC address as shown in figure below.

  6. Type regedt32 or regedit in Start -> Run box or in Start Search for Windows Vista. Note: for Windows NT 4.0 and Windows 2000, regedt32 must be used.
  7. Navigate to the following registry key: HKEY_LOCAL_MACHINE\SYSTEM\CurrentControlSet\Control\Class\{4D36E972-E325-11CE-BFC1-08002BE10318}
  8. Expand the {4D36E972-E325-11CE-BFC1-08002BE10318} tree, and there will be more sub-keys in the form of 0000, 0001, 0002 and so on.
  9. Go through each sub-key starting from 0000, look for subkey that has DriverDesc value data that matches NIC description copied from step above, that want its MAC address to be changed. In most cases, it will be similar to the network adapter card name.To verify that the subkey found is indeed a correct one, check the value of the NetCfgInstanceId, which should have the same value with the NIC’s GUID taken from step above.
  10. Once a sub-key is matched to the network interface card that MAC address want to be spoofed, select and highlight the subkey. Right click on the sub-key (for example, 0000), then select New -> String Value. Name the new value name as NetworkAddress. Note: If NetworkAddress REG_SZ registry key is already existed in the right pane, skip this step.
  11. The double click on NetworkAddress and enter a new MAC address as its value data.
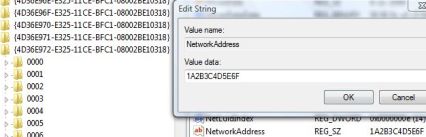
Note that the 12-digit MAC address in hexadecimal format, and should be entered without any dash (-). For example, 1A2B3C4D5E6F.
  12. Reboot the system to make the new MAC address effective. Alternatively, if you don’t want to restart the system, try to disable and then re-enable the network adapter in Device Manager.
  13. To verify the change of MAC address, go to command prompt, then type in one of the following commands: ipconfig /all
net config rdr

Note: To restore or reset back to true original hardware burned-in MAC address, remove the NetworkAddress registry key that is been added.

Alternative: Third party tools and utilities to change the MAC address in Windows operating system are plenty, for example: SMAC (direct download link to smac20_setup.ex, supports Windows Vista, XP, 2003, 2000), Macshift (direct download link to macshift.zip, for Windows XP), BMAC (almost identical SMAC MAC changer clone by moorer-software.com), Mac MakeUp (direct download link to macmakeup.zip, for Windows 2000/XP/2003/Vista), MadMACs (MAC Address Spoofing And Host Name Randomizing App For Windows, directly download MadMACs.zip), EtherChange (direct download link to etherchange.exe), and Technitium MAC Address Changer (for Windows 2000 / XP / Server 2003 / Vista / Server 2008).

How to Change MAC Address (MAC Spoofing) in Linux and *nix

To change your MAC address in Linux and most Unix-like (*nix) system, run the following script commands:

ifconfig down

ifconfig hw

ifconfig up

For example, the command looks lik “ifconfig eth0 down hw ether 1A:2B:3C:4D:5E:6F”. First command brings down the network interface, second command change its MAC address while third command bring up the interface again. Note that in some cases, to bring down and bring up the network interface, the following commands have to be used:

/etc/init.d/networking stop or /etc/init.d/network stop (in the case of Fedora Core 5)

/etc/init.d/networking start or /etc/init.d/network stop (in the case of Fedora Core 5)

Alternatively, for Fedora Code 5 Linux with Iproute2 tools installed, the following commands also can change the MAC address to spoofed version:

/etc/init.d/network stop

ip link set address 1A:2B:3C:4D:5E:6F

/etc/init.d/network start

For example, “ip link set eth0 address 1A:2B:3C:4D:5E:6F”. To check whether the MAC address has been spoofed, use ip link ls eth0 or ip addr ls eth0 instead of using ifconfig eth0.

How to Make the Spoofed MAC Address Permanently Even After Reboot in Linux

Edit the ifcfg-eth0 file (or other similar file if you’re changing different interface), add the following variable line to the file:

MACADDR=12:34:56:78:90:ab

Then run service network restart to make the change effective immediately.

How to Make the Spoofed MAC Address Permanently on Restart in Debian

Edit the /etc/network/interfaces file and add in the following variable line to the appropriate section so that the MAC address is set when the network device is started.

hwaddress 02:01:02:03:04:08

For example, “hwaddress ether 02:01:02:03:04:08″.

Alternative: GNU Mac Changer (for Debian, Slackware, ArchLinux, Mandrake, Crux and other RPM-based distributions such as Fedora, Red Hat, CentOS, ASPLinux, SUSE Linux, OpenSUSE and etc.

How to Change MAC Address (MAC Spoofing) in BSD or FreeBSD

Issue the following commands in shell:

ifconfig down

ifconfig

ifconfig up

First command brings down the network interface (optional), second command change its MAC address while third command bring up the interface again (optional). For example, the command looks lik “ifconfig xl0 link 1A:2B:3C:4D:5E:6F” or “ifconfig fxp0 ether 1A:2B:3C:4D:5E:6F”

How to Change MAC address in Solaris

The shell command to change the MAC address in Sun Solaris is as below:

ifconfig


For example, the command looks like “ifconfig hme0 ether 1A:2B:3C:4D:5E:6F”. Note that the change is temporary that does not persist after a reboot. To make this change permanent, the command can be placed in a runtime control script (/sbin/sh).

How to Spoof MAC Address in HP-UX

It’s possible to change MAC address using HP-UX SAM. Select Networking and Communications, then selecting the interface, then click on Action -> Modify -> Advanced Options. Finally, change the value of station address, which is MAC address name in HP-UX.

How to Spoof and Change MAC Address in OpenBSD

Use the following command to change MAC Address to spoofed MAC in OpenBSD (after version 3.8):

ifconfig lladdr

For example, “ifconfig bge3 lladdr 1A:2B:3C:4D:5E:6F”.

How to Change to Spoofed MAC Address Permanently in OpenBSD

To make the MAC address changed at boot before network connection is established, and even before parsing of hostname.* file, edit the /etc/netstart file to add in the following lines before the line of “# Now parse the hostname.* file”:

if [ "$if" = "INTERFACE" ]; then
ifconfig lladdr
fi

# Now parse the hostname.* file
....

How to Change MAC Address in Mac OS X

Since Mac OS X 10.4.x (Darwin 8.x) onwards, the MAC address of wired Ethernet interface can be altered in Apple Mac OS X in a fashion similar to the Linux and FreeBSD methods. To do so, type the following command in Terminal.app:

sudo ifconfig en0 ether aa:bb:cc:dd:ee:ff

or

sudo ifconfig en0 lladdr aa:bb:cc:dd:ee:ff (for Mac OS X 10.5 Leopard)

where en0 is the network interface (numbered from en0, en1, en2 …) and aa:bb:cc:dd:ee:ff is the desired MAC address in hex notation.

Alternative: MacDaddy (download MacDaddyX.dmg, support Airport wireless adapter)

src: mydigitallifeinfo

Firefox... sudah tak asing lagi di telinga para penghuni dunia maya.. ya.. Firefox merupakan salah satu browser tercepat saat ini yang dikembangkan oleh Mozilla. Pemakaian Firefox juga sangatlah mudah, karena mudahnya, kita juga dapat melakukan sedikit perubahan pada kinerja Firefox browser kita.
Berikut ini beberapa cara agar Firefox kita dapat berjalan dengan lebih cepat.

  • Pipeline Enabling
  • Umumnya, firefox bekerja dengan "sopan" terhadap server website yang anda kunjungi. Firefox mengirim paket data lalu menunggu response dari server dan mendownload data yang diberikan oleh server.Namun dengan fasilitas pipelining, kita dapat melakukan pengiriman multiple data tanpa menunggu terlebih dahulu response dari server, hal ini mungkin akan memperlambat waktu download data, namun dalam beberapa kasus, hal ini sangatlah berguna.
    Cara untuk mengaktifkan pipelining adalah melalui configurasi di firefox, ketik about:config pada adress bar anda, jika ada konfirmasi, klik saja..
    Lalu ikuti proses berikut:
    - double-click network.http.pipelining set nilai menjadi true
    - double-click network.http.proxy.pipelining set nilai menjadi true
    - double-click network.http.pipelining.maxrequests set nilai menjadi 8

  • Render Time lebih cepat
  • Masih pada configurasi, klik kanan pada halaman konfigurasi(di bagian yg tidak ada tulisannya). Pilih New > Integer. ketik : content.notify.interval -> OK -> ketik 500000 (lima ratus ribu)-> OK

  • Loading lebih cepat
  • Loading lebih cepat disini maksudnya adalah perpindahan status treshold dari idle ke downloading data, biasanya membutuhkan waktu 0.75 detik, nah waktu ini yang kita persingkat lagi sehingga browser lebih responsive.. caranya :
    - klik kanan di window konfigurasi pada bagian kosong,
    - ketik content.switch.threshold -> OK -> isi nilainya 250000 (0,25 detik)-> ok

  • No interruptions
  • caranya:
    - klik kanan di layar konfigurasi
    - pilih New > Boolean
    - ketik content.interrupt.parsing -> OK
    - set nilainya menjadi False

  • Block Flash
  • Gunakan AdBlock Plus pada mozilla firefox anda untuk memblokir content flash dari suatu website. Add-ons nya dapat di download disini

  • Menaikkan cache size
  • Masih di layar konfigurasi, klik kanan di bagian kosong,lalu:
    - Pilih New > Integer
    - isi nilainya 65536 -> OK
    - restart browser

  • Install Javascript Engine Tracemonkey
  • install tracemonkey dari link ini jalankan, lalu masuk ke jendela configurasi.
    - double-click javascript.options.jit.chrome -> nilai di set menjadi true
    - double-click javascript.options.jit.content -> nilai di set menjadi true


    Masih ada banyak lagi cara yang dapat kita gunakan untuk mempercepat kinerja browser firefox kita.. jika ada waktu, akan saya tambahkan lagi :) selamat mencoba

    Sudah lihat tampilan sederhana blog saya kan.. ya di bagian kanan blog saya ini terdapat sebuah profile badge facebook kepunyaan saya.. Bagaimana menampilkan profile badge di facebook? Anda bisa melihat artikel saya sebelumnya [ klik disini ]
    Berminat membuat objek seperti itu di blog anda? tidak susah koq.. Mari kita buat..
    Pertama, buka dahulu bagian control layout blog anda lalu klik menu edit HTML
    copy script dibawah ini :
    <script language='JavaScript' type='text/JavaScript'>
    function Scroller(){
    if (document.all) Offset=document.body.scrollTop;
    else Offset=window.pageYOffset;
    document.getElementById('object1').style.top=Offset+'px';}
    setInterval('Scroller()',100);
    </script>


    paste script di atas sebelum tag </head> di layout anda. Kemudian save..
    Untuk mengatur posisi dari object yang kita tampilkan nantinya, copy dan paste script css berikut sebelum bagian layout seperti ini : css script goes here.... ]]></b:skin>
    #object1
    {
    position:absolute;
    visibility:show;
    left:0px;
    top:0px;
    z-index:2;
    background-color: #99FF00;
    layer-background-color: #99FF00;
    border: 1px none #000000;
    border-color: #FF0000;
    border-left-style: solid;
    border-bottom-style: solid;
    border-right-style: solid;
    border-top-style: solid;
    }

    save layoutnya kembali.
    Lalu setelah tag <body> sisipkan script seperti ini :

    <script language='JavaScript' type='text/JavaScript'>document.write("
    <div id='object1'>
    <table width=140 border=0 cellspacing=20 cellpadding=0>
    <tr>
    <td bgcolor='#00CCFF'>Scroller Menu</td>
    </tr>
    </table>
    </div>
    ")/>

    lalu save..
    Pada bagian di antara tag <div> </div> silahkan anda tambahkan hal-hal yang anda ingin tampilkan... dan jangan lupa untuk mengatur posisi dari scrolling-object anda dan tampilannya melalui style cssnya.. Selamat mencoba...

    Anda mungkin pernah menonton film dokumentasi tentang perjalanan seseorang yang bernama Kevin Mitnick. Ya.. dia adalah seorang hacker yang pernah dikejar-kejar oleh FBI (Federal Bureau Investigation).
    Apa itu hacker? Anda mungkin memiliki persepsi yang berbeda-beda tentang pengertian hacker itu sendiri. Namun secara awam kita tahu bahwa hacker adalah orang yang berusaha dan dapat membobol komputer orang lain lewat sebuah jaringan akses Network, baik lokal maupun global.
    Namun tahukah anda, bahwa hacker itu sendiri juga punya karakteristik, dan level masing-masing..? Ya, mereka juga ada rating tersendiri yang mereka buat berdasarkan tingkat kemampuan, karakteristik maupun tujuan mereka melakukan hacking itu sendiri.

    Secara ringkas, berdasarkan tingkat kemampuan seorang hacker, mereka diklasifikasikan menjadi :

    1. Mundane Person

    Merupakan orang yang pada dasarnya tidak mengerti tentang hacking, hanya tahu bahwa seorang hacker adalah orang yang mengakses komputer orang lain. (Saya berada pada golongan ini :D )
    2. Lamer
    Merupakan kategori hacker yang "bermulut besar", karena mereka hanya tau menggunakan script atau code yang dibuat oleh orang lain, tanpa mengerti bagaimana proses dari script tersebut. Biasanya orang-orang seperti ini ditemui pada IRC user yang sering menggunakan script bot yang dibuat oleh orang lain.
    3. Wannabe
    Merupakan kategori hacker tingkat lanjut, biasanya orang-orang dalam golongan ini sudah memiliki dan mengerti tentang yang namanya "philosophy of hacking" dan bukan sekedar menerobos ke dalam komputer orang lain, mereka memang termasuk pemula, tapi mereka mulai mencari tau dan belajar tentang yang namanya hacking.
    4. Larva
    Merupakan kategori hacker dimana seseorang sudah dapat melakukan hacking sendiri dengan metode sendiri dan caranya sendiri, berusaha melakukannya berulang kali hanya untuk memastikan bahwa dia mengerti proses dari hacking yang dia lakukan itu seperti apa. Orang dalam kategori ini biasanya masih dalam tahap "WAS-WAS" karena mereka masih belum berani untuk melakukan sesuatu hal pada komputer yang mereka terobos, seperti misalnya menghapus file atau direktory untuk menghindarkan jejak mereka tercium oleh pemilik PC tersebsut.
    5. Hacker
    Merupakan kategory semifinal dari seorang hacker. Pada level ini, seorang hacker sudah berani melakukan aksi pada komputer yang dia terobos.Mengapa dikatakan kategori semifinal? karena masih ada level yang lebih tinggi.
    6. Ueberhacker
    Apa itu ueberhacker? Ini mungkin didasarkan pada Jerman Nietzsche's uebermann ("overman").Title ini pertama dipakai dalam sebuah tulisan yang berjudul "A Guide to Internet Security" oleh Christopher Klaus (5 Desember 1993), dimana dalam tulisannya menerangkan tentang bagaimana mengelabui seorang hacker. Dari komunitas "Social Engineering", diberikanlah sebutan orang-orang seperti ini sebagai "Ueberhacker"
    Kategori hacker berdasarkan kemampuan khusus dalam bidang tertentu (misalnya hacker OS/Operating System), mereka dibagi menjadi 2 kategory:
    1. Wizard
    Merupakan kategori dimana seseorang sudah tahu banyak tentang suatu hal yang dia kuasai, misalnya dia ahli dibidang Operating System Linux. Dia sudah tau banyak tentang Linux dan segala sesuatunya.
    2. Guru
    Merupakan kategori dimana seseorang tidak hanya tahu banyak tentang hal yang dia kuasai, namun juga tau tentang fitur-fitur yang tak terdokumentasikan. Orang-orang seperti ini biasanya melakukan dan mengembangkan hal-hal baru yang melebihi kemampuan umum dari sebuah program. Bahkan mungkin melebihi creator program itu sendiri.
    Kategori hacker berdasarkan tujuan dari seseorang melakukan hacking :
    1. Dark-side Hacker
    Merupakan kategori hacker yang sifatnya membuat bencana besar, seperti penyebar Virus yang membuat kacau ribuan bahkan jutaan komputer di bumi ini. Orang-orang seperti ini biasanya melakukan hal tersebut hanya untuk kesenangan belaka namun sifatnya bencana besar.

    2. Malicious Hacker
    Merupakan kategori hacker yang sifatnya sekedar merusak komputer tertentu. Tujuan hacker tersebut biasanya hanya ingin mencoba keahliannya sendiri, atau mungkin balas dendam maupun dengan tujuan mencari uang(dibayar oleh orang lain).

    3. White Hacker
    Merupakan kategori hacker yang dibayar untuk mencari kelemahan-kelemahan sebuah applikasi yang telah dibangun.
    Mungkin masih banyak kategori-kategori lain yang belum disebutkan, tapi karena keterbatasan waktu menulis dan mencari sumber berita, untuk sementara hanya ini yang dapat saya tuliskan. Mungkin di lain waktu akan saya tambahkan, seperti tentang carder, Cracker, & Warez d00dz

    Facebook, siapa yang ga kenal dengan web society ini... Bagi para penghuni dunia maya, facebook merupakan salah satu web society yang di gandrungi. Banyak fitur-fitur keren yang ditawarkan oleh facebook sehingga penggunanya pun semakin banyak pula.
    Di Facebook jg disediakan profile badge yang bisa kita pakai untuk menjaring teman-teman maupun relasi melalui blog atau webpage kita.

    Nah bagaimana caranya kita menampilkan profile badge tersebut di blog? Untuk para pemakai wordpress mungkin sudah banyak yang menuliskan di blog masing-masing. Tapi untuk pemakai blogger, semua panduan yang saya lihat, kebanyakan sih banyak yang gagal menampilkan badge tersebut. Nah. disini saya akan bagikan tipsnya :)

    Buat terlebih dahulu badge Facebook Anda (saya rasa anda sudah mengetahui caranya).
    Lalu bagaimana menampilkan badge tersebut di blogger kita?
    kita mulai saja.

    Setelah anda membuat badge Facebook Anda, contoh seperti ini :

    Lalu, buka souce code halaman badge tersebut : caranya klik kanan pada halaman facebook badge , lalu view source.
    Carilah script seperti ini :

    <!-- Facebook Badge START -->
    <a target="_TOP" title="Dedi Sinaga" href="http://en-gb.facebook.com/dedzcnaga">
    <img style="border: 0px none ;" alt="Dedi Sinaga" src="http://www.facebook.com/badge.php?id=1521856648&bid=78&key=1521917548&format=png&z=365417030"/>
    </a>
    <!-- Facebook Badge END -->

    Copy source tersebut, jangan menggunakan source yang diberikan dari halaman facebook, karena hal tersebut tidak berlaku di blogger.

    Tambahkan source tersebut pada layout blogger anda. Anda boleh menambahkan di kolom widget. Silahkan dicoba :) semoga bisa membantu ;)

    Apa itu Mafia Wars??
    Mafia Wars merupakan sebuah MMORPG berbasis web yang di kembangkan oleh ZYNGA dan di kombinasikan dengan beberapa web sosial community seperti: MySpace dan Facebook

    Mafia Wars yang saya mainkan sekarang berjalan di via FaceBook.. ini Profile Mafia Wars Saya :)

    Dedi Sinaga
    anakmedan

    Level: 186 ( Maniac )
    Mafia Members: 201

    1st step : Mencegah virus berjalan saat flash disk di masukin ke usb port

    Sebelum nyolokin flash disk, anda harus memastikan beberapa hal penting dalam System PC anda. Kalau pake LINUX sich, ga usah takut… ga bakalan jalan koq, jadi saya hanya memberikan trick khusus pengguna OS berbasis Microsoft Windows.
    Syarat pertama:
    Pastikan kalau settingan folder options untuk view hidden file, file extension dan super hidden-nya aktif.
    Caranya:

    1. Via folder options:

    - Buka Windows Explorer, trus arahkan Cursor ke Folder Options, pilih tab View, trus cari pilihan Hidden Files and folders, pilih Show Hidden Files and folders.
    - Lihat ke bagian bawahnya. Hilangkan tanda checklist pada bagian Hide extension for known file types.
    - Lihat lagi di bawahnya ada tertera Hide protected operating system files (Recomended), hilangkan tanda checklist pada bagian itu.
    - Apply lalu OK
    Nah bila langkah di atas sudah terlaksana, kita bisa lanjut ke step berikutnya.
    2. Via Windows Registry

    Selain via Folder options, dapat pula lewat registry, caranya:

    • Buka menu Run pada start menu atau shortcutnya tekan tombol Windows + R (Tombol Windows ada di antara tombol Control ( Ctrl) dan Alternative (Alt)).
    • Ketikkan regedit.OK
    • Ikuti tree berikut, cari dalam tree-nya
    • HKEY_CURRENT_USER\Software\Microsoft\Windows\CurrentVersion\Explorer\Advanced.
    • Trus di bagian sebelah kanan layar, cari Hidden double klik lalu ubah nilai desimal menjadi 1
    • Berikutnya, HideFileExt dengan cara yang sama ubah nilai desimalnya menjadi 1
    • Next, ShowSuperHidden double klik ubah nilainya menjadi 1
    Dengan begini persiapan sudah ok.

    Follow the next step.

    2nd step:

    Disable the AUTOPLAY

    Untuk hal yang satu ini, perlu dimengerti bahwa virus yang ada sekarang ini kebanyakan aktif melalui AUTORUN. Hal ini perlu dicegah, makanya kita disable saja fitur autoplaynya.

    Caranya:


    1.Dengan menggunakan TuneUp Utilities

    Dalam hal ini, aku pakai TuneUp Utilities 2008, nah fitur yang dipakai adalah TuneUp System Control. Setelah aplikasi ini dijalankan, pilih menu drives, lalu pilih tab autoplay. Pada
    bagian autoplay, lihat sub menu autoplay, pilih tombol advanced. Di layar akan tampil pilihan drive yang kita mau non aktifkan autoplaynya. Hilangkan tanda checklist pada bagian removable drive dan bila anda mau, pada bagian CD/DVD drives juga boleh di non aktifkan. Hal ini untuk menghindari virus dalam CD aktif saat di jalankan. Karena bila virus memakai perintah autorun agar aktif otomatis saat flash disk / CD /DVD di buka, perintah tersebut tidak akan dijalankan.

    2.Via TweakUI
    Mungkin tidak semua dari kita mengenal software TweakUI ini, tapi kalau punya TweakUI boleh pakai juga koq, lumayan buat nambah pengetahuan fitur-fitur dalam Windows.Setelah TweakUI dijalankan, pilih tree My Computer, selanjutnya ikuti tree Autoplay -> Drives, nah pada layar akan ditampilkan semua drive A-Z. Kalau anda memakai virtual drive seperti ALCOHOL120%, Daemon, dan sebagainya, anda terlebih dahulu harus mengetahui drive virtual apa yang anda aktifkan untuk emulasi. Misalnya, anda memakai DRIVE harddisk dipartisi menjadi C,D,E,F & G sementara untuk Optik Drive seperti CD/DVD adalah drive H, maka untuk removable drive adalah dari I-Z. Nah yang anda hilangkan adalah tanda checklist dari I-Z tersebut.

    3.Via Registry

    Bagaimana bila tidak ada kedua software tersebut? Jangan khawatir, Windows punya jalan lain koq, sepertipepatah bilang “1000 jalan ke Roma”, atau mungkin bisa di bilang juga “Banyak Rute Menuju Sukabirus”.

    Caranya adalah, jalankan registry Windows seperti pada 1st step sebelumnya. Terus cari tree berikut :
    HKEY_Current_User\Software\Microsoft\Windows\CurrentVersion\Policies\Explorer

    Nah,kalau udah ketemu pada bagian kanan layar, klik kanan, trus pilih New -> Binary Value terus beri nama: NoDriveAutoRun

    Ingat nama tersebut jangan sampai salah ketik, baik itu spasi maupun huruf kapitalnya. Lalu tekan Enter.
    Terus, kita ubah nilainya caranya, klik kanan pada value yang kita buat tadi, trus modify atau modify binary data…. (Keduanya sama saja) Untuk nilainya, kita bisa pake value berikut:


    Cara membaca kombinasinya:

    Bila drive a-h mau di disable, maka lihat baris dengan nilai a-h = 0 dan value binary yang kita masukkan ke dalam binary data sebelumnya adalah ff 00 00 00 (ingat: diketik tanpa spasi ).


    NB: bila ingin menanyakan kombinasi enable/disable autoplay drive lainnya, boleh email ke aku, alamatnya dedz_cnaga@yahoo.com.sg

    3rd step : Tracking the Virus


    Seperti sebelumnya aku utarakan dalam tulisan ini, bahwa virus dapat menipu mata kita, yakni dengan cara merubah icon untuk file virus sebagai folder atau file lainnya, padahal ekstensi “folder” itu adalah application (.exe,.bat.com).
    Karenanya kita jangan tertipu. Lalu bagaimana cara kita mengetahui apakah di flash disk kita ada virus atau tidak? Ini hal yang paling penting…..
    Apabila fitur autoplay drivenya belum di disable, maka bila saat autoplay berjalan CANCEL,JANGAN JALANKAN APAPUN WALAUPUN OPEN FOLDER,CANCEL AJA karena hal ini bisa memicu virus menjadi aktif lewat flash disk.
    Trus kita tracking lewat windows explorer.
    Syaratnya:
    Pastikan hidden file disable, hide extension disable, show hidden system file enable (ikuti 1st step)
    Buka windows explorer, pastikan mini browser aktif (ada tampilan tree nya), shortcutnya tekan tombol Windows + E (Win + E).
    Lalu pada bagian mini browser (tree view), klik pada drive flash disk kita misal drive flash disk kita adalah H, klik pada tree drive H, nah pada bagian kananbrowsernya, kita cari file AUTORUN.INF/AUTORUN.INI. hal ini bergantung pada jenis virusnya juga. Nah bila terdapat file tersebut, kemungkinan besar, flash disk anda terjangkit virus (kebanyakan sich virus dengan extensi .vbs) kalau pengen tahu, apa flashdisk memang ada virusnya, klik kanan pada file autorunnya, trus edit (terserah mau pake notepad, atau ultra edit 32). Lihat isi filenya apaan apakah terdapat tulisan yang mirip/menyerupai :

    Atau
    mungkin pula isinya adalah open=Thumbs.db.com ? Kalau iya, berarti flash disk
    anda ada virusnya.

    Lalu bagaimana? Apa yang harus dilakukan?

    Cari file yang di eksekusi tersebut lalu hapus dengan cara menekan Shift + Delete.

    Hapus juga autorun nya. Tapi kalau anda ingin mempelajari virus tersebut, klik kanan pada virusnya, pilih rename, ubah extensinya menjadi .txt (misal: .vbs menjadi .vbs.txt) lalu file virus akan berubah menjadi file text. Seandainya ada file dalam flash disk yang terinfeksi virus bagaimana cara mengetahuinya? Caranya mudah saja, lihat saja ekstensi filenya
    (Type filenya). Klik kanan pada layarnya, view -> details, kalau iconnya dokumen atau folder tapi type filenya application, maka itu adalah virus…. Trus cara bersihinnya gimana?

    Cara 1: Shift + Del

    Cara 2: bersihkan pake antivirus, kalo ga update, ubah aja dulu extensinya jadi txt, ntar kalau udah update, scan lagi….

    Cara 3: buang kode hexa dokumen yang mengandung hexa dari virusnya (Hal ini sangat sulit untuk dilakukan. Karenanya tidak saya tuliskan dalam tulisan ini, sebab saya juga masih sedang menyempurnakan kemampuan tracking hexa virus dalam dokumen).

    Sebenarnya masih banyak cara lain untuk men-tracking virus yang belum aku tuliskan karenanya kalau teman-teman punya cara lain bagi kan juga ke aku, mail me please…

    Sapa tau aku juga belum tahu.

    Kesimpulannya:

    Melacak keberadaan virus tanpa anti virus dapat dilakukan dengan cara sederhana di atas. Hal ini dapat membantu kita dalam menghemat pemakaian memory computer bagi anti virus yang sifatnya RTP (Real Time Protecting) dan mempercepat proses start up komputer karena tidak memakai antivirus.

    Nah mungkin trick ini banyak yang sudah mengetahuinya, tapi mungkin ada juga yang belum tahu…

    Kalau misalnya teman-teman ada yang udah tau, ilmunya dibagikan kepada teman yang lain…. Hal ini untuk mewujudkan kampus IT Telkom sebagai kampus bebas Virus Komputer ;) (moga-moga aja bisa…)

    Saran aku buat pembaca, bila tetap ingin memakai antivirus, gunakan anti virus yang sifatnya RTP karena hal ini dapat membantu tracking dan cleaning virus secara Real time. Untuk anti virus non rtp gunakan PC-MAV (ada di cd PC Media yang ada di edisi khusus majalah PC Mild ) atau juga ANTIVIRX ( http://www.geocities.com/indoprog).

    Saya tidak menuliskan cara tracking dari Linux karena kalau pemakai linux biasanya tidak perlu khawatir dengan Virus…. Sebab setahu ku virus tidak mudah aktif dalam linux….


    Share

    Subscribe to: Posts (Atom)